Berikut aan dijelaskan instalasi KVM pada Centos 6.5
- Silahkan membuat CD Instalasi Minimal untuk Centos 6.5 64 bit
Jika anda belum memiliki, silahkan melihat artikel http://www.proweb.co.id/articles/erp/cd_centos_iso.html . - Silahkan instal Centos 6.5 Minimal di server anda
- Matikan SELinux:
# cat /etc/sysconfig/selinux# This file controls the state of SELinux on the system.
# SELINUX= can take one of these three values:
# enforcing – SELinux security policy is enforced.
# permissive – SELinux prints warnings instead of enforcing.
# disabled – No SELinux policy is loaded.
SELINUX=disabled
# SELINUXTYPE= can take one of these two values:
# targeted – Targeted processes are protected,
# mls – Multi Level Security protection.
SELINUXTYPE=targeted - Silahkan edit konfigurasi ethernetnya sehingga bisa akses internet misalnya:
# cat /etc/sysconfig/network-scripts/ifcfg-eth0
DEVICE=eth0
HWADDR=44:87:FC:E0:E6:62
TYPE=Ethernet
UUID=c36a6bbc-c369-458e-bff7-b4dcc8a4aed5
ONBOOT=yes
NM_CONTROLLED=no
BOOTPROTO=no
IPADDR=192.168.21.27
GATEWAY=192.168.21.1# cat /etc/resolv.conf
nameserver 192.168.21.1 - Kondisi jaringan sebelum instalasi KVM adalah
# ifconfig
eth0 Link encap:Ethernet HWaddr 44:87:FC:E0:E6:62
inet addr:192.168.21.27 Bcast:192.168.21.255 Mask:255.255.255.0
inet6 addr: fe80::4687:fcff:fee0:e662/64 Scope:Link
UP BROADCAST RUNNING MULTICAST MTU:1500 Metric:1
RX packets:126 errors:0 dropped:0 overruns:0 frame:0
TX packets:100 errors:0 dropped:0 overruns:0 carrier:0
collisions:0 txqueuelen:1000
RX bytes:12307 (12.0 KiB) TX bytes:15552 (15.1 KiB)lo Link encap:Local Loopback
inet addr:127.0.0.1 Mask:255.0.0.0
inet6 addr: ::1/128 Scope:Host
UP LOOPBACK RUNNING MTU:16436 Metric:1
RX packets:0 errors:0 dropped:0 overruns:0 frame:0
TX packets:0 errors:0 dropped:0 overruns:0 carrier:0
collisions:0 txqueuelen:0
RX bytes:0 (0.0 b) TX bytes:0 (0.0 b) - Kondisi iptables sebelum instalasi KVM adalah:
# iptables –list
Chain INPUT (policy ACCEPT)
target prot opt source destination
ACCEPT all — anywhere anywhere state RELATED,ESTABLISHED
ACCEPT icmp — anywhere anywhere
ACCEPT all — anywhere anywhere
ACCEPT tcp — anywhere anywhere state NEW tcp dpt:ssh
REJECT all — anywhere anywhere reject-with icmp-host-prohibitedChain FORWARD (policy ACCEPT)
target prot opt source destination
REJECT all — anywhere anywhere reject-with icmp-host-prohibitedChain OUTPUT (policy ACCEPT)
target prot opt source destination - Lakukan instalasi KVM:
#yum install kvm python-virtinst libvirt libvirt-python virt-manager virt-viewer libquestfs-tools
Proses ini akan lama tergantung kecepatan internet anda, pastikan anda mempunyai koneksi internet yang bagus. - Setelah instalasi KVM, silahkan restart server anda
- Kondisi interface setelah instalasi KVM adalah:
# ifconfig
eth0 Link encap:Ethernet HWaddr 44:87:FC:E0:E6:62
inet addr:192.168.21.27 Bcast:192.168.21.255 Mask:255.255.255.0
inet6 addr: fe80::4687:fcff:fee0:e662/64 Scope:Link
UP BROADCAST RUNNING MULTICAST MTU:1500 Metric:1
RX packets:162 errors:0 dropped:0 overruns:0 frame:0
TX packets:157 errors:0 dropped:0 overruns:0 carrier:0
collisions:0 txqueuelen:1000
RX bytes:17713 (17.2 KiB) TX bytes:25075 (24.4 KiB)lo Link encap:Local Loopback
inet addr:127.0.0.1 Mask:255.0.0.0
inet6 addr: ::1/128 Scope:Host
UP LOOPBACK RUNNING MTU:16436 Metric:1
RX packets:0 errors:0 dropped:0 overruns:0 frame:0
TX packets:0 errors:0 dropped:0 overruns:0 carrier:0
collisions:0 txqueuelen:0
RX bytes:0 (0.0 b) TX bytes:0 (0.0 b)virbr0 Link encap:Ethernet HWaddr 52:54:00:AA:BE:22
inet addr:192.168.122.1 Bcast:192.168.122.255 Mask:255.255.255.0
UP BROADCAST RUNNING MULTICAST MTU:1500 Metric:1
RX packets:0 errors:0 dropped:0 overruns:0 frame:0
TX packets:0 errors:0 dropped:0 overruns:0 carrier:0
collisions:0 txqueuelen:0
RX bytes:0 (0.0 b) TX bytes:0 (0.0 b) - Kondisi iptables setelah instalasi KVM adalah
# iptables –list
Chain INPUT (policy ACCEPT)
target prot opt source destination
ACCEPT udp — anywhere anywhere udp dpt:domain
ACCEPT tcp — anywhere anywhere tcp dpt:domain
ACCEPT udp — anywhere anywhere udp dpt:bootps
ACCEPT tcp — anywhere anywhere tcp dpt:bootps
ACCEPT all — anywhere anywhere state RELATED,ESTABLISHED
ACCEPT icmp — anywhere anywhere
ACCEPT all — anywhere anywhere
ACCEPT tcp — anywhere anywhere state NEW tcp dpt:ssh
REJECT all — anywhere anywhere reject-with icmp-host-prohibitedChain FORWARD (policy ACCEPT)
target prot opt source destination
ACCEPT all — anywhere 192.168.122.0/24 state RELATED,ESTABLISHED
ACCEPT all — 192.168.122.0/24 anywhere
ACCEPT all — anywhere anywhere
REJECT all — anywhere anywhere reject-with icmp-port-unreachable
REJECT all — anywhere anywhere reject-with icmp-port-unreachable
REJECT all — anywhere anywhere reject-with icmp-host-prohibitedChain OUTPUT (policy ACCEPT)
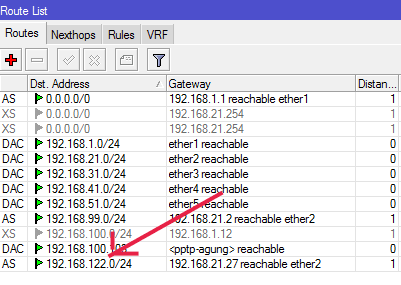
target prot opt source destination - Saat ini dalam server tersebut kita secara virtual mempunyai segmen jaringan sendiri yaitu 192.168.122.0/24
Untuk mengetahui mengenai virtual networking pada KVM ini silahkan melihat https://access.redhat.com/site/documentation/en-US/Red_Hat_Enterprise_Linux/6/pdf/Virtualization_Administration_Guide/Red_Hat_Enterprise_Linux-6-Virtualization_Administration_Guide-en-US.pdf pada bab 18: Virtual Networking. - Jika anda mau mencoba mengakses jaringan tersebut, kita bisa menambahkan routing pada router kita, atau routing pada komputer kita misalnya:

- Untuk memastikan anda bisa memasuk ke network 192.168.122.0/24 , silahkan SSH ke 192.168.122.1 dan pastikan anda dapat login.
- Instalasi X Server:
Ada kalanya XServer diperlukan untuk instalasi suatu guest operating system.
Jika instalasi suatu virtual machine atau guest operating system mengalami kegagalan dengan error
‘Probing EDD (edd=off to disable)… ok’ , maka bisa diatasi dengan menginstal virtual machine tersebut melalui X Server.Untuk instalasi X server silahkan menjalankan
# yum -y groupinstall “Desktop” “Desktop Platform” “X Window System” “Fonts”
Anda perlu koneksi internet yang cepat dan stabil untuk instalasi ini. Informasi lebih lanjut silahkan mengunjungi http://www.idevelopment.info/data/Unix/Linux/LINUX_AddGNOMEToCentOSMinimalInstall.shtml . - Mengenai networking, ada baiknya disediakan network-card khusus dipakai untuk virtual machine seperti dibicarakan di http://docs.fedoraproject.org/en-US/Fedora/13/html/Virtualization_Guide/sect-Virtualization-Network_Configuration-Bridged_networking_with_libvirt.html .
- Informasi lebih lanjut silahkan mengunjungi
a. http://wiki.centos.org/HowTos/KVM
b. http://linux.dell.com/files/whitepapers/KVM_Virtualization_in_RHEL_6_made_easy.pdf .
c. http://www.linux-kvm.org/page/Networking .
d. http://docs.fedoraproject.org/en-US/Fedora/13/html/Virtualization_Guide/sect-Virtualization-Network_Configuration-Bridged_networking_with_libvirt.html . - Berkaitan dengan virtualisasi KVM di Red Hat 6:
1. http://linux.dell.com/files/whitepapers/KVM_Virtualization_in_RHEL_6_made_easy.pdf .
2. https://access.redhat.com/site/documentation/en-US/Red_Hat_Enterprise_Linux/6/pdf/Virtualization_Getting_Started_Guide/Red_Hat_Enterprise_Linux-6-Virtualization_Getting_Started_Guide-en-US.pdf .
3. https://access.redhat.com/site/documentation/en-US/Red_Hat_Enterprise_Linux/6/pdf/Virtualization_Host_Configuration_and_Guest_Installation_Guide/Red_Hat_Enterprise_Linux-6-Virtualization_Host_Configuration_and_Guest_Installation_Guide-en-US.pdf .
4. https://access.redhat.com/site/documentation/en-US/Red_Hat_Enterprise_Linux/6/pdf/Virtualization_Administration_Guide/Red_Hat_Enterprise_Linux-6-Virtualization_Administration_Guide-en-US.pdf - Lanjutan artikel berikutnya adalah http://www.proweb.co.id/articles/erp/instalasi_vm_kvm.html .
Kunjungi www.proweb.co.id untuk menambah wawasan anda.

