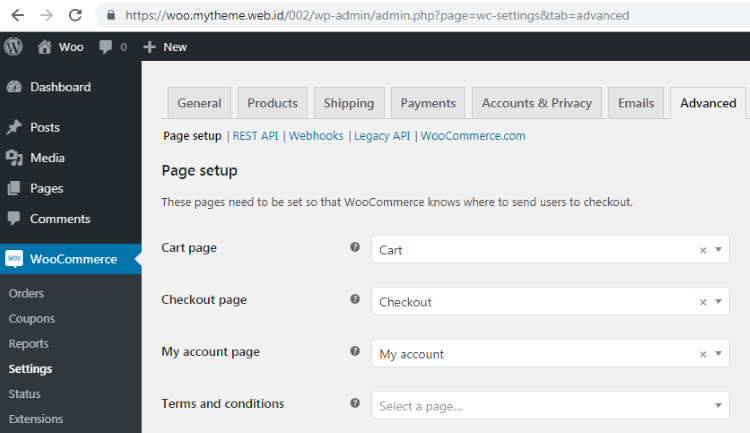
Pada artikel sebelumnya kita telah memahami mengenai halaman-halaman baru saat kita melakukan instalasi plugin WooCommerce. Pembelajaran kemudian dilanjutkan dengan menghubungkan WooCommerce dengan halaman-halaman ini dalam Advance seting untuk WooCommerce seperti gambar di bawah ini:

Kita kemudian akan melanjutkan bagian selanjutnya dari seting Advance untuk WooCommerce ini seperti berikut ini
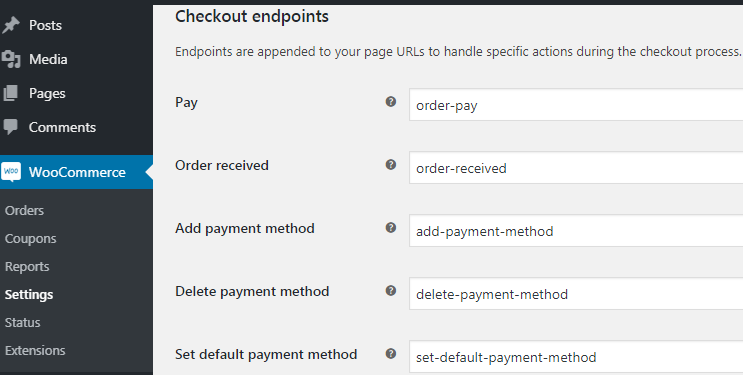
- Checkout endpoints

Dari penjelasan di atas maka url-url tersebut akan ditambahkan pada halaman /checkout/ seperti
a. https://woo.mytheme.web.id/002/checkout/order-pay/
b. https://woo.mytheme.web.id/002/checkout/order-received/
c. https://woo.mytheme.web.id/002/checkout/order-pay/add-payment-method/
d. https://woo.mytheme.web.id/002/checkout/order-pay/delete-payment-method/
e. https://woo.mytheme.web.id/002/checkout/order-pay/set-default-payment-method/

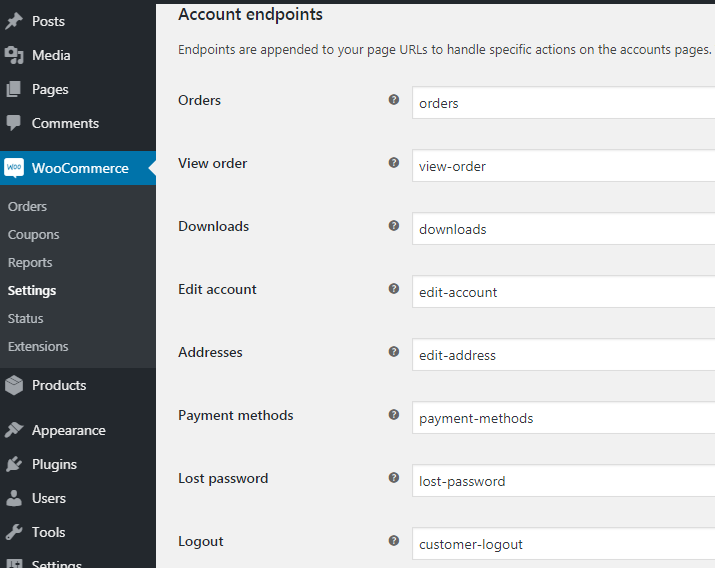
- Account endpoints

Dari penjelasan di atas maka url-url tersebut akan ditambahkan pada halaman /my-account/ seperti pada contoh
a. https://woo.mytheme.web.id/002/my-account/orders
b. https://woo.mytheme.web.id/002/my-account/view-order
c. https://woo.mytheme.web.id/002/my-account/downloads
d. https://woo.mytheme.web.id/002/my-account/edit-account
e. https://woo.mytheme.web.id/002/my-account/edit-address
f. https://woo.mytheme.web.id/002/my-account/payment-methods
g. https://woo.mytheme.web.id/002/my-account/lost-password
h. https://woo.mytheme.web.id/002/my-account/customer-logout

Informasi lebih lanjut silahkan mengunjungi
1. https://docs.woocommerce.com/document/woocommerce-endpoints-2-1/ .
2. https://docs.woocommerce.com/document/woocommerce-pages/ .
Kunjungi www.proweb.co.id untuk menambah wawasan anda.
Halaman endpoint WooCommerce

